The sound of a modern Rock and Metal snare drum is something some of us really desire to achieve in our mixes.
This article presents the tools and techniques you should master and apply to get that loud and massive snare sound in your music productions.
Let’s begin!
Equalization
The equalization of the snare drum should focus primarily on two different aspects:
First, find the fundamental note of the snare drum and boost or cut it appropriately. The fundamental note is the lowest note the snare drum. You don’t want a thin-sounding snare drum – which is what happens when you cut the fundamental frequency too much – but remember that sometimes you can make a snare drum sound pretty good without an exaggerated fundamental note.

Anything below the fundamental frequency can be gently removed with a high-pass filter.
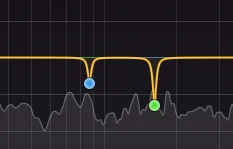
Secondly, you should equalize the boxiness out of the snare drum. Find the frequencies that may be making your snare drum sound like a card box, and attenuate them with a wide bell filter. Frequencies for this type of problem should be located somewhere between 300-600 Hz.

Snare drums may also present some other problematic frequencies that sound harsh, exaggerated, or unnatural. For these, you will need to use surgical bell filters to remove them.
However, if you find that your snare drum has too many of these problems, read the section «Choose the right snare drum samples» below.
You may apply some equalization to the high-mids / highs of the drums, but since you’ll also be applying an exciter, you may want to keep these adjustments subtle.
Transient Shaper
Do not bother with overly complicated transient shapers: those with just the basic attack and sustain parameters are just fine to achieve appropriate results.
Unlike a compressor, the transient-shaper is a tool that manipulates the snare drum sample independently of its amplitude – meaning it doesn’t matter if the sample is being played soft or hard. So it will shape all snare hits the same way.
Note that I’m not saying it makes them sound all the same! But for both the soft and hard hit, the transient shaper can make their attacks/tails more/less prominent. So this means that the transient shaper will be appropriate for the overall shaping of all the snare sounds in a specific track, no matter their dynamics. For this purpose, you want to use the transient at the beginning of the processing chain.
But you may also add the transient shaper at the end of the plugin chain, after the Maximizer, to restore some of the transients that may have been attenuated during the process. Different mixing philosophies recommend different approaches. Know they exist. Try them. And then decide which one you like the most!
Compression
Threshold and Ratio parameters control the amount of compression applied. Attack and Release control the attack, tail, tone, and feel of the snare drum.
For modern rock and metal snare drum sounds, it’s normal to compress it a fair bit. But don’t go overboard with it: we’re still going to apply a maximizer and parallel compression to it afterward.
| Fast Attack | Less Transients / Initial Attack |
| Slow Attack | More Transients / Initial Attack |
| Fast Release | More Tail / Body |
| Slow Release | Less Tail / Body |
You should try to preserve some of the snare’s transients by having a moderate attack time. Later on, you’ll add parallel compression with a very fast attack and release time, to complement the compression you have on this snare track.
Maximizer
A maximizer will give more consistency, volume, and power to your snare drum. Having a moderate maximizer after a compressor is a much better and more natural-sounding solution than simply having one compressor with extreme settings! The use of a maximizer is essential to achieve the sound of a modern snare drum.
Exciter
Adding some type of saturation or distortion to the snare drum is a good way to enhance its presence, clarity, and character. It’s definitely something you should be using to get a modern snare sound.
It’s important to be aware that, like most other processes, it should be used moderately, otherwise you’ll end up ruining your snare sound by making it too harsh.
You should be applying some multiband excitation to your snare drum, focusing on the frequencies above, say, 1000 Hz.
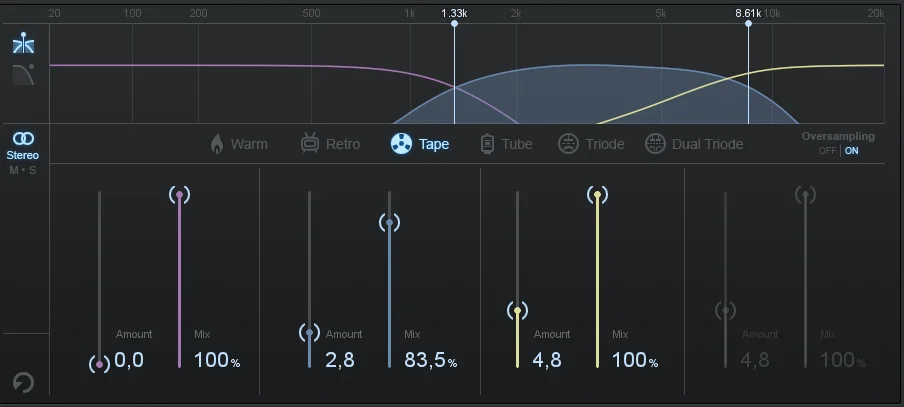
Mids and Low frequencies don’t require this kind of processing.
By doing this you will make the snare drum pop out more, and sound louder, without actually having its waveform increased. This means that you achieve more loudness in your mixes without actually using more headroom. This is one of those little secrets that saturation and distortion offer you, and that you should take advantage of if you want to make your mixes sound louder without constantly relying on the limitier at the end of your master channel.
Sidechain Multiband Compression / Dynamic Equalizer
You can analyze other tracks to see if there are conflicts with the most important frequencies of the snare, which are its fundamental notes and the higher frequencies.
If you find any conflict, you may want to apply a sidechain multiband compressor, or a dynamic equalizer to those other tracks, which will trigger every time that the snare drum hits.
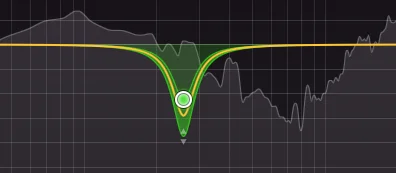
This will clear those frequencies out of those other tracks to make room for the snare drum to be heard and felt properly and in your face!
Reverb
Reverb is a key component to getting a massive modern snare drum.
First, use a separate reverb for your snare drum.
To get that huge modern massive reverb sound, configure your reverb to have little to no pre-delay and about 1.5 to 2.5 seconds of decay time. The specific decay time should be timed and calculated according to the tempo of the song.
The Reverb should be put into a Send / FX / Auxiliary track so that you can equalize it separately. Apply a low-pass filter and a high-pass filter to it. Control some frequencies around the 200-700 Hz range with a bell filter to prevent the reverb from muddying the mix.
A good reverb plugin that sounds good for snare drums is the Waves Manny-Marroquin Reverb.
Far Room Microphones
Another thing you should be using alongside the Reverb plugin, to get a massive snare sound, is the far room microphone samples, if you have them.
These samples normally sound good compressed with little transients and a long tail, and they are what actually make your reverb sound huge.
Snare Overheads Microphones
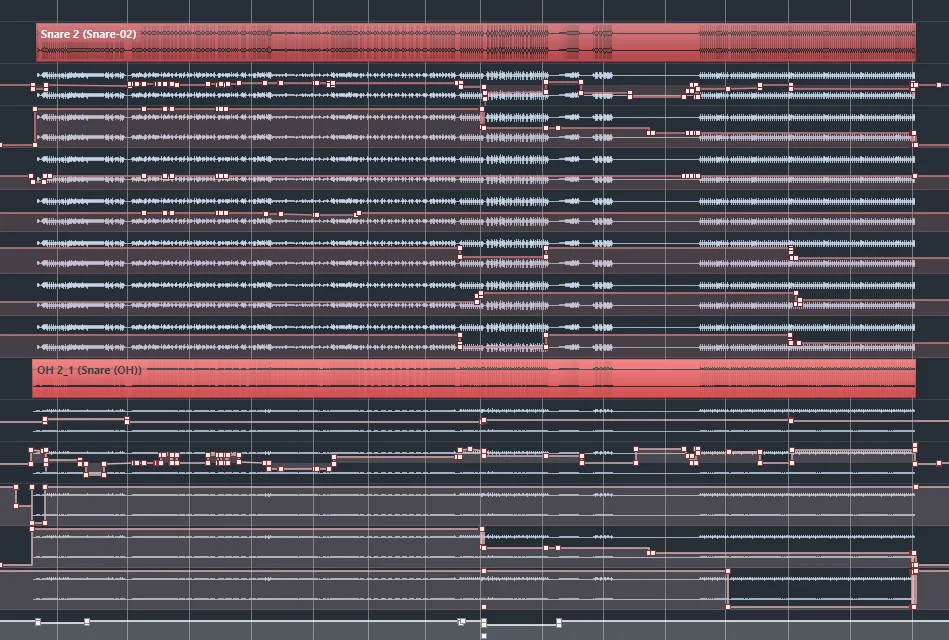
If you’re using virtual drum instruments you are in luck because you can find a way to have access to the isolated snare overheads track, without all the bleeding from the cymbals and other components of the drums.
This will give you extreme flexibility to process this track with EQ, compression, maybe a bit of saturation, and reverb to take advantage of the nice snare tail / sustain sound the overheads usually provide.
Then blend it with the close snare microphone track.
Parallel Processing
Using parallel processing is one of those techniques that brings, very easily, the snare drum to the front of the mix. By being such a powerful and effective tool, you may end up using it excessively. Be careful and try to use it subtly.
The way you do it is by placing a compressor with extreme settings on a Send / FX / Auxiliary track and blending it with the original snare drum. This works because you get to retain the original dynamics of the snare drum and the powerful punch and weight of the processed parallel signal.
For maximum flexibility, you should configure the original snare drum to preserve its attack/transients; and configure the parallel compressor to remove the attack but exaggerate the tail of the snare. Now you have at your disposal two signals that possess different characteristics, ready to be blended to your taste! Pro tip: for the massive snare drum sound we’re looking for, a prominent tail is what makes the sound powerful!
The parallel snare drum must be sent to the reverb track as well.
Automation
When we’re talking about huge modern rock and metal snare drums, we’re talking about those really hard snare hits.
But sometimes, we go into softer sections of a song, and the hard hits (and, consequently, the massive snare drum sound we’ve been trying to achieve up until this point) are no longer appropriate.
When that happens, you need to apply some automation to some of the things you’ve been doing up until now, to achieve a more intimate snare sound: increase the attack, reduce the tail, reduce the reverb, reduce the room and OH microphone levels and reduce the parallel processing.
This will make your song sound more natural and organic. It may seem like it’s a bit too much work, but remember that automation (and any other kind of attention to detail) is what separates the men from the boys.
Snare Drum Plugin Chain Order?
Go with something like:
- EQ (subtractive only) > Transient Shaper > Compression > EQ (additive/subtractive) > Saturation > Limiter or
- EQ (subtractive only) > Compression > Saturation > EQ (additive/subtractive) > Limiter > Transient Shaper
In the end, though, it’s easy to swap the plugin order and hear how it affects the sound. Always go with the solutions that sound better to your ears.
Multi-Device Check + Reference tracks
Always check your snare (and the whole mix, obviously) on as many different devices as possible. Here’s a checklist of how else you should be checking your mixes:
- Studio Monitors (summing your mix to mono);
- Regular Computer Desktop Speakers;
- Professional Headphones;
- Consumer-level Headphones;
- Laptop Speakers;
- Smartphone Speakers;
- Car Speakers;
By listening to your mix in different devices and acoustic environments, any mixing problems will become apparent very easily.
Also, make sure that you listen to reference tracks on all those different devices. The goal is not to make your snare sound amazing on all the devices. After all, the devices themselves may not be good enough to make any snare sound amazing on them. What matters is that your snares sound as good as your reference tracks.
MCompare is a plugin that allows you to compare your mix with reference tracks from your DAW, matching the loudness between the songs automatically and so on. It also has extra features like allowing you to compare how your snare drum sounds before and after one (or multiple) plugins, matching the loudnesses automatically as well. It’s an indispensable tool in my arsenal for all kinds of AB testing.
Use the coupon MELDA0169075 to get a 20% discount.
Choose the Right Snare Drum Samples
If you are one of those people who think that you should be such an amazing mixing engineer that you’re capable of turning any sample into pure gold, perish that thought!
All the pros know this one truth: it all starts at the source. Without a really good-sounding snare, recorded by a really good microphone in a good room, you’re not being able to compete with those who are taking advantage of that.
Take a listen to these awesome-sounding rock and metal snare drum samples in our library. We recommend starting with Metal Snares Pack 2.0, a Snare Drum VST Plugin containing a collection of 5 powerful snares drums:
Metal Snares Pack 2.0
Explore Other Snares Samples

The best snare samples mix themselves. Starting with the best samples means that you will only have to waste minimal time tweaking your plugins to make your snare sound work in your mix. With a poor snare drum sample, even if you follow everything by the book, you will always end up, at best, just with an okay sound.
Join the Newsletter
Interested in topics like producing, mixing and plugins for heavy music? Leave your email below and I’ll keep you updated.